Sorry about leaving y'all mightily confused about focus stacking, so this is me trying to explain in very simple terms and with pictures. Because we loves us some pictures.
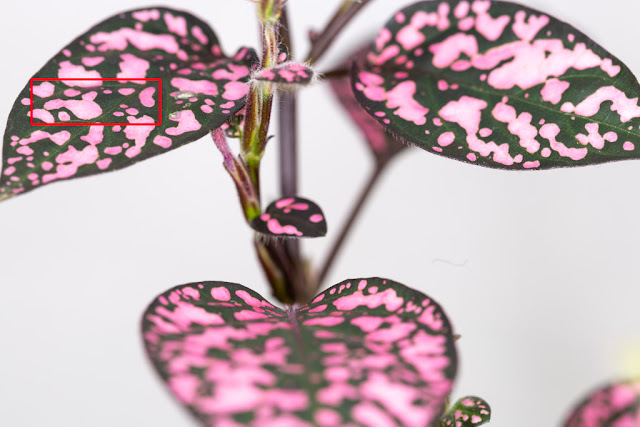
When you are working up close with a macro lens, the area that can be in focus is very small. Look at the red box in the following photo. That's what's in focus, more or less anyway..
Now look at how out of focus the other leaves are, bearing in mind that this is a very small plant to begin with. Even the back of the leaf that is in focus is already blurring, nevermind the farther leaves (which I repeat are not really very far away at all — maybe two inches).
In the next photo, a section of the upper right leaf is in focus, once again more or less, and the bottom leaf is pretty blurry by now.
Finally, I have a section of the left leaf in focus.
That's the photography part, except that I used more than three focal points when I made the image that I showed yesterday and which is also below, but three are enough to give you the general idea about how shallow the depth of field is in macro photos.
When the photography part is over, the various images go into one Photoshop document as separate layers. The program them finds and reveals the most focused parts of each image to blend them into one image, which if you get it right, is all in focus. If one really wanted to, one could do this blending manually by painting in the part that they wanted to reveal from each photo. But I could not really be bothered when the machine can probably do it better and certainly faster.
I didn't quite manage to get it all tack sharp, but overall it was acceptable. While in Photoshop, I also replaced the white background with colours from the flower.
Update especially for Tabor: Once you have images layered in Photoshop, select them all and go to Edit>Auto-Align Layers checking Auto box. Next step is to Edit>Auto-Blend Layers as per the following image..
Photoshop will apply appropriate masks, which you can then merge into one image.


I've never used Photoshop. This is a great How To. I have two African Violets, my dad loved them. He had a dozen. I knew he was ill when he was unable to look after them. Mom covered up for him, though. sigh.
ReplyDeleteI have Photoshop Elements and will have to see if this is available. I was wondering how you were sure you were masking or erasing correctly.
ReplyDeleteThanks for the lesson AC. I admire your photographic work.
ReplyDeleteToo grim for me.
ReplyDeleteInteresting. I'll share this with my hubby.
ReplyDeleteVery creative!
ReplyDeleteI usually do it by hand because my version of Corel Photopaint does not have that feature. but it does blend edges, so I trim and paste. Yours sounds like a much more efficient fix.
ReplyDeleteGreat idea to colour the background. (Damn American spellcheck anyway. I LIKE the ou spelling.
You are way beyond mme in Photoshop. I am at the home darkroom stage. Simply lovely stuff.
ReplyDelete