=====================
Well, it has taken me a while to get back into blogging, but life has been busy, and I thought I would take a little vacation from blogdom. It didn't take long for something else to fill the gap though, so life didn't get less busy, just a tad more relaxing.
AC posted a blog about the Peppermint Afghan I made for Shauna's birthday, and asked me to do a guest blog about the creative process for some of you interested bloggers out there. So here goes....
Some time last fall Shauna sent me a picture of a Peppermint Afghan, and jokingly suggested that I make her one. I thought the pattern was beautiful and worth looking into to see how difficult it might be. Maybe, just maybe I could do it. After some searching I discovered it was a free pattern from Red Heart wool so I downloaded it. What a surprise to find 5 long, detailed pages of instructions sitting in the printer tray. After one attempt to read through it I knew it was beyond me. I couldn't make head nor tail of most of it. Sigh!
Luckily I noticed a link to a video on the web page, and it was just what I needed to walk me through each and every step of the pattern. It was over an hour long, and I watched it over and over again as I inched my way through the pattern.
After watching the video a few times and getting the pattern etched into my brain, I went in search of some wool and a crochet hook. What an adventure that was. A local craft store had wool on sale, so AC and I set off with pattern in hand. I had no idea how to read the instructions on type of wool, weight, how many balls to buy etc, so stopped many ladies in the wool section of the store to ask if they were knitters, and would they please help me with this pattern. Most were very helpful, and as AC and other husbands patiently stood by, very kind ladies wandered around the wool department with me, helping me choose the right weight, and number of balls of wool I would need. After an exhausting hour or so, we finally walked out of the store with a big bag of red and white wool. Sheesh, what an ordeal.
Now the real work or fun, would begin.
The first step in the process was to make 42 peppermint circles. Rows 1 to 10 were the same for all 42, so once I got that pattern in my head, it was clear sailing, but row 11 was different. So, I made all 42 circles up to row 10, then set about completing row 11 on each one.
I needed 10 circles with pattern 1 for row 11; 10 circles with pattern 2 for row 11; 9 circles with pattern 3 for row ll; 9 circles with pattern 4 for row 11; 2 circles with pattern 5 for row 11; and 2 circles with pattern 6 for row 11. Are you confused yet?
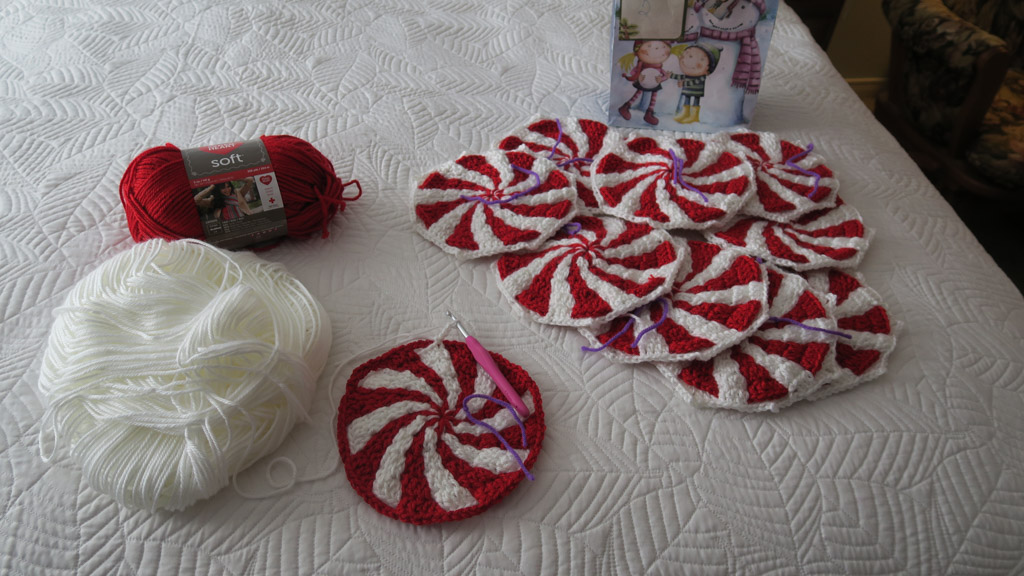 |
| A picture of motif #1. The lone circle with the red edging shows the finished motif or circle up to row 10. The group of 9 shows the finished motif with the unique white edging. |
 |
| Reverse side of the motif. The red and white wool is not stitched together, just woven along the underside. |
 |
| The pattern also called for 30 small square motifs to intersperse in the design when sewing the afghan together. They were all the same, so once I got to this step it was easy peasy! Sort of. |
 |
| To keep myself organized I set up 6 bags each labeled with the motif number, and colour coded each bag and motif with different coloured wool. This was a very important step, as each numbered motif would be placed in a different location on the afghan when I started sewing it together. Yikes what a puzzle. |
 |
| If you look closely, you will notice the different coloured threads on each circle. |
 |
| I had extra wool left over, so I added the red and white boarder, but it was not called for in the pattern. |
Surprisingly I got it done ahead of schedule, and presented it to her at dinner one night in January.
 |
| Looks great doesn't it? |
 |
| Lots of room for us all to snuggle down under. |
15 comments:
It looks quite simple, not that I could do it, but then you explain and my goodness, talk about laborious! I think I have a new project for my sister though (once she finishes my nativity!), because I love it.
Great post, Sue. Love the afghan too. Beautiful job! A real treasure!
Flat out stunning. REally beautiful. Thanks for sharing this with us.
While I enjoyed reading about the process and the end result is colorful and looks very comfy, this is not a project I would attempt myself. That said, you did a fantastic job, Sue.
It's just so beautiful, sure to become a family heirloom!!
That sounds complicated to me, and I've done some crocheting in my life. You did a wonderful job; it's beautiful and unique!
I really wish I could knit or crochet, but I feel like an old dog!
Oh my gosh- that's beautiful!
Wow!
That is so beautiful! I am so impressed!
Oh wow, this is a amazing. What a crazy project though, a true labour of love. Thanks for pointing me to this post AC, I did not follow your blog back when this post was published and I am pleased see it now, almost two years later. Please tell Sue that I admire here perseverance and skills.
This is simply delightful, Sue. I applaud you. Thanks for giving the second one to the cat lady. I admit that I cannot figure out where the red bordered ones are in the finished throw, but I sure love it.
Mage - It looks confusing doesn't it? Every peppermint/motif gets a white border before putting the afghan together. The border changes the shape from a circle to an octagon so each side fits snugly against the small motifs when sewing the pieces together. It was a challenge at first I must say, but now I have the pattern and process in my head, I love doing it, and it gets easier with each afghan. It takes me all winter to complete, so it is the perfect project for me to get lost in while listening to an audio book on frosty winter afternoons.
I was curious! Nope. I couldn't do it!
Just stunning! I had never seen this pattern before. Reading the steps that you went through to make this I realized this is a true labor of love. I don't think I would ever make this except at the request of either my mom or my daughter. There's a whole lot of math in there! I was taught to crochet by my mom in my teen years but had not done anything for years. In the past year I have started again because I wanted something to do to keep my hands busy in the evening while I watched tv because otherwise my hands want to play with potato chips and that's not good at all. I'm really enjoying it again. Kuddos to you, this is stupendous!
Post a Comment